An Ape, Several Kegs and a Girl
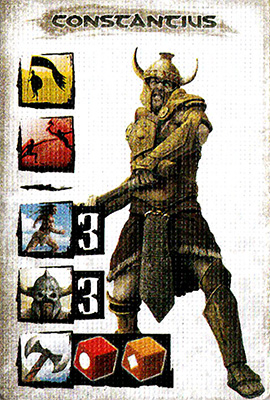
In the Khorshemish region, a small group of individuals climb steep slopes flanking a decrepit fortress. Conan the Cimmerian leads the way. He came to help his friend Pelias, the powerful mage of the Court of Koth. The latter is accompanied by his impetuous de- fender stamping his feet furiously, a young man from the Aquilonian province of Tauran. If the boy seems to be a nervous wreck, it is because he fell madly in love with a companion of the magus, but the latter was abducted by a vile mercenary known as Constantius. This brigand is in the habit, among other misdeeds, to supply the Zamorian brothels or the Turanian seraglios with the young women he succeeds in abducting.
Pelias knows that unfortunately he cannot solicit the King’s help in this matter, for the monarch is a miser in terms of men and money and as such he has some consideration for Constantius who executes all his dirty works at the cheapest price possible. This is why the magician has decided to act by himself, to both help his faithful defender in finding his sweetheart and punish the human being trafficker.
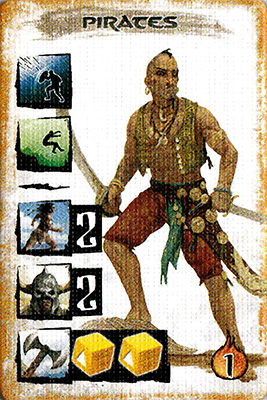
As the group arrives at the gates of the citadel, he is tackled by a large gray ape, obviously trained by Constantius, who uses its superhuman strength to throw kegs filled with pitch at them.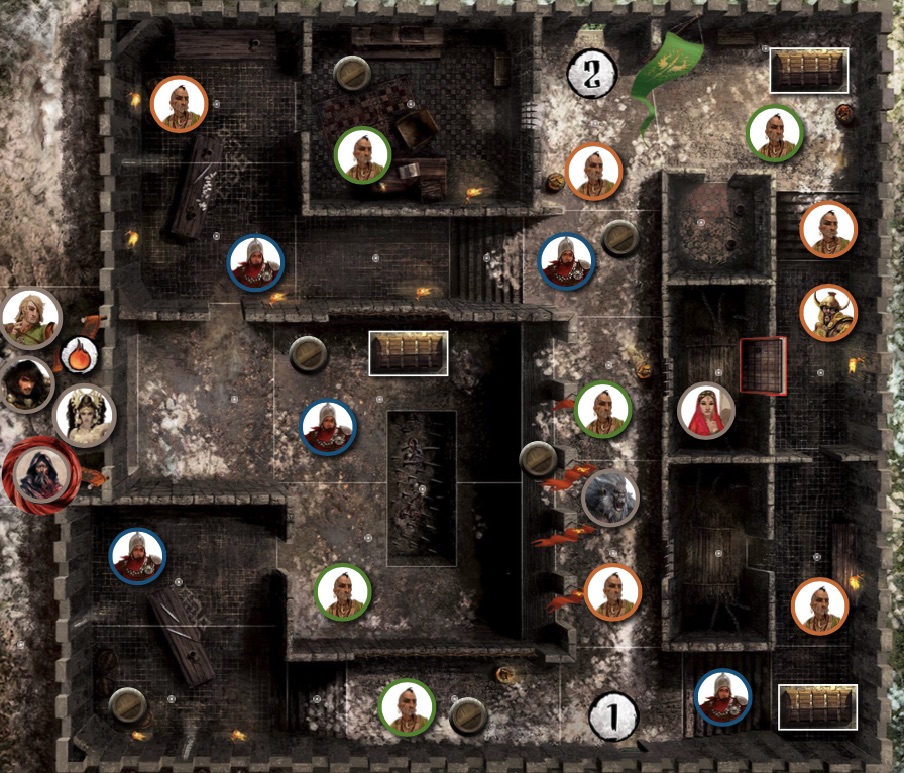
Winning the Game
Heroes
If Gitara flees the citadel before the end of turn 6; the heroes win the game.Overlord
If the Overlord prevents Gitara from fleeing the Citadel or if Gitara dies before the end of turn 6; the Overlord wins the game.Setup
Heroes
 |
The game starts with the heroes’ turn. |
4 |
Suggested Heroes and Equipment: |
|
 |
Conan the General (Conan’s Sword) | |
 |
Pelias (Dagger, Black Staff and 3 Spells: Set’s Bite Set’s Halo, and Eel Skin. Pelias starts the game with Set’s Halo activated) | |
 |
Bêlit (Ornamental Spear) | |
 |
Balthus (Zingaran Bow) |
 |
After setup, each hero moves 5 gems from their Reserve zone to their Fatigue zone. |
Overlord
 |
The Overlord starts with 9 gems in their Reserve zone and 3 in their Fatigue zone, and places the recovery token showing a recovery value of “7” in the Book of Skelos. |
 |
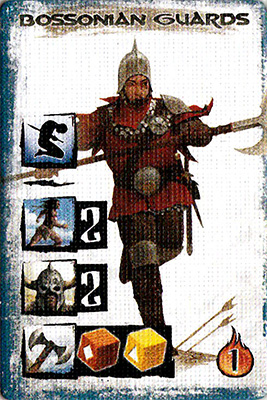
When an event tile is activated the Overlord resolves the following event: Reinforcement: 2 reinforcement points
|
 |
 |
 |
 |
|
 |
 |
|
 6 |
 4 |
Special Rules
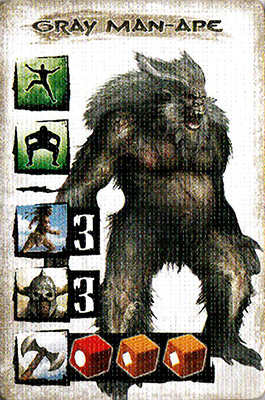
Keg of Pitch:
If the Gray Man-Ape is on the same
area as a Keg of Pitch token
 to throw
the keg in an area in the Gray Man-Ape’s line of sight. The Overlord
follows the same rules for throwing an object as the heroes and rolls
the Melee attack Value of the Gray Man-Ape to determine the distance of
the throwing. The keg of pitch immediately explodes in the area it is
thrown in.
to throw
the keg in an area in the Gray Man-Ape’s line of sight. The Overlord
follows the same rules for throwing an object as the heroes and rolls
the Melee attack Value of the Gray Man-Ape to determine the distance of
the throwing. The keg of pitch immediately explodes in the area it is
thrown in.
If a model of the Overlord is in the same area as a Keg of Pitch token,
the Overlord may choose to replace the model’s Melee attack so that the
keg explodes.
When a keg of pitch explodes, all the models in the area of the keg are
the target of an area attack of 2 Red
 dice.
The usual defenses against the area attacks may be used. The Keg of Pitch
token is then removed from play.
dice.
The usual defenses against the area attacks may be used. The Keg of Pitch
token is then removed from play.
A hero in a keg of pitch’s area may perform a simple manipulation to pick
it up and transport it; the hero places the Keg of Pitch’s token on their
hero’s sheet. A keg of pitch has an encumbrance of 6. If a hero suffers
a wound while carrying a keg of pitch, they immediately put it down in
the area where the hero is located, without the keg of pitch exploding.
Gitara’s Cell:
The door holding Gitara captive is
reinforced. A hero in the area next to the door token
 may perform a complex Manipulation with a difficulty of 3 to remove
that door from the board.
may perform a complex Manipulation with a difficulty of 3 to remove
that door from the board.
 Gitara:
During setup, the Overlord places Gitara’s tile next to the board. As
long as Gitara’s door remains closed, Gitara cannot be attacked nor be wounded.
Gitara:
During setup, the Overlord places Gitara’s tile next to the board. As
long as Gitara’s door remains closed, Gitara cannot be attacked nor be wounded.
As soon as the door is removed from the board, the heroes take the
Gitara tile who becomes an ally of the heroes and may be activated once
per Heroes’ turn. A hero with Leadership can activate Gitara by moving
one gem from their Reserve zone to their Fatigue zone. Similarly, they
may purchase additional Movement points for Gitara by moving gems from
their Reserve zone to their Fatigue zone.
A hero in Gitara’s area gains the Bodyguard skill. Only heroes with
Bodyguard can spend gems to defend
Gitara by using that skill.
Reinforcement:
The Overlord may bring back reinforcements in any of the areas marked
 ,
,
 or
or
 .
If the Overlord chooses to bring back reinforcement in the areas
marked
or ,
they remove the corresponding token and replaces it with a Portcullis
token .
The portcullis is now considered lowered. The Overlord can no longer
bring back reinforcements in that area and the heroes can no longer
flee from that area.
.
If the Overlord chooses to bring back reinforcement in the areas
marked
or ,
they remove the corresponding token and replaces it with a Portcullis
token .
The portcullis is now considered lowered. The Overlord can no longer
bring back reinforcements in that area and the heroes can no longer
flee from that area.
Destroying a Portcullis:
A hero in the area next to a Portcullis token
and carrying a keg of pitch may perform a complex Manipulation with a
difficulty of 3 to destroy the portcullis and remove that Portcullis
token from the board. The explosion of the keg does not cause any damage
to the models in that area and the Pitch of Keg token is discarded.
The heroes can now flee from that area.
Fleeing the Citadel:
A hero or an ally model can flee the citadel from one of the outer
areas to the west of the board by spending movement points as though
the model was moving across a border. The model is then removed from
the board. Once a model has fled, the model cannot be returned to the
board. The Units of the Overlord cannot flee from the citadel. A hero
or an ally model can flee in the same way by one of the areas marked
by or
tokens
on the setup diagram if that area does not contain a Portcullis token
.
Leaping From/Climbing a Balcony:
A character can move across a railing from a balcony area to a ground
floor area as though it were a border. The character rolls 2 Yellow
 dice
for falling damage. If the character has
Leap, the character rolls 1
Yellow die
instead. A character with Climb
can move across a railing from a ground floor area to a balcony area by
spending 2 extra movement points.
dice
for falling damage. If the character has
Leap, the character rolls 1
Yellow die
instead. A character with Climb
can move across a railing from a ground floor area to a balcony area by
spending 2 extra movement points.
Pit: A character must spend 1 extra movement point to move out of the pit area.
Chests: During setup, the Overlord places 3 chests on the board as indicated by the setup diagram. The asset deck contains: 1 Life Potion, 1 Leather Armor, and 1 Mitra’s Mace.