The Lost King
Overthrown by a conspiracy seeking to seat Valerius, the heir of the former king Numedides, on the throne of Aquilonia, Conan has disappeared.
To save his kingdom, on which the banners of the Nemedian Dragon now flutter, the Cimmerian has traveled to Stygia, a dark region of sorcery and unspeakable horrors. He left to look for the Heart of Ahriman, a magical jewel needed to defeat the sorcerer Xaltotun, the powerful partisan of the plotters, and take back the reins of what is rightfully his.
So, the uncrowned king went after Thuthtmes, a priest of Set who also covet the legendary gem for his own. Conan’s trail then vanished somewhere between the port town of Khemi and the capital city of Luxur, as he might have been imprisoned.
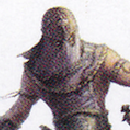
But all hope is not lost. A small group of adventures who remained loyal to King Conan have followed his trail to the doorstep of Luxur and its massive, bleak, and oppressive buildings, typical of the local architecture. Lead by Ikhmet, a renegade Stygian assassin, not very concerned about is employer’s identity as long as he is well paid, the king’s followers have found the entrance to a complex network of underground caves alongside the river Styx. This is where they believe Conan to be held.
The rumor says that Set himself, the ancient god of chaos, still roams in the shadows of the mysterious Stygian temples. But who knows what looms in the dark depths of the underground tunnels in which the heroes just entered.
Winning the Game
Heroes
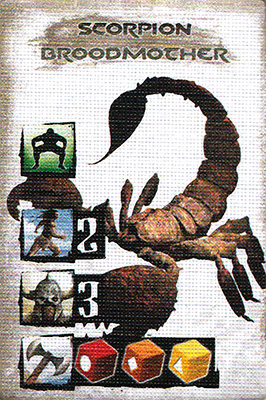
If the Scorpion Broodmother dies before the end of turn 8, the heroes win the game.Overlord
If all the heroes die or if the Scorpion Broodmother is still alive at the end of turn 8, the Overlord wins the game.Setup
Heroes
 |
The game starts with the heroes’ turn. |
 |
The heroes start in the
area. |
3 |
Suggested Heroes and Equipment: |
|
 |
Ikhmet (2 Assassin’s Dagger) | |
 |
Shevatas (Battle Axe) | |
 |
Hadrathus (Dagger and Pass through Walls) |
4 |
Suggested Hero and Equipment: |
|
 |
Bêlit (Sword) |
 |
After setup, each hero moves 3 gems from their Reserve zone to their Fatigue zone. |
Overlord
 |
3 heroes: The Overlord starts with 8 gems in their Reserve zone and 3 in their Fatigue zone, and places the recovery token showing a recovery value of “5” in the Book Skelos. | |
|
4 heroes: The Overlord starts with 9 gems in their Reserve zone and 4 in their Fatigue zone, and places the recovery token showing a recovery value of “7” in the Book Skelos. |
 |
When an event tile is activated the Overlord resolves the following event: Reinforcement: 3 reinforcement points
|
 .
. |
 |
 |
 |
 |
 |
|
|
 5 |
Special Rules
Well:
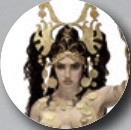
The game board represents 2 levels of a Stygian temple with level 1 being
exactly on top of level 0. The level is indicated by the icon on the
lower-left corner of each level. Six wells connect the two levels but
only one is opened enough to let a human pass through it. During setup,
the Overlord looks at the six well tokens
 with a
X or a ✔
and places them facedown on level 1 of the board as indicated by the
setup diagram. Then the Overlord places the other six well tokens on the
level 0 of the board as indicated by the setup diagram. A hero in an
area with a facedown well may perform a complex Manipulation
with a difficulty of 1 to reveal it. If the well token shows a
X, the token is placed faceup in that
area and the hero draws one card from the asset deck. If the well token
shows a ✔, the token is placed
faceup in that area and represents the open well.
with a
X or a ✔
and places them facedown on level 1 of the board as indicated by the
setup diagram. Then the Overlord places the other six well tokens on the
level 0 of the board as indicated by the setup diagram. A hero in an
area with a facedown well may perform a complex Manipulation
with a difficulty of 1 to reveal it. If the well token shows a
X, the token is placed faceup in that
area and the hero draws one card from the asset deck. If the well token
shows a ✔, the token is placed
faceup in that area and represents the open well.
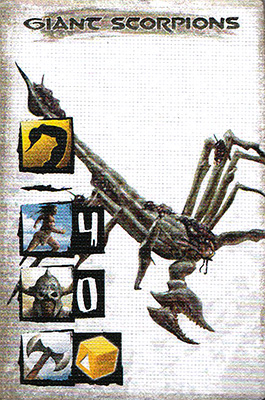
Moving Through a Well: A character with or without Climb in the opened well’s area may move from level 1 to level 0 (and the other way) by spending 2 extra movement points. Moving through a well takes a character’s model to the area with a well token directly above or below. The Giant Scorpions may move through all the wells, open or not, with no movement penalty. The Scorpion Broodmother cannot move through wells.
Moving Through Secret Passages:
Each level is traversed by a network of secret passages which entrances
are represented by secret passage tokens
 .
A character in an area with a secret passage may move to another area
with a secret passage of the same level by spending 2 extra movement
points. To move through a secret passage, both areas with the entrance
and the exit must be clear of enemies. The Overlord’s units and Ikhmet
know the nooks of the temple and may move through a secret passage with
no movement penalty. The Scorpion Broodmother cannot move through secret passages
.
A character in an area with a secret passage may move to another area
with a secret passage of the same level by spending 2 extra movement
points. To move through a secret passage, both areas with the entrance
and the exit must be clear of enemies. The Overlord’s units and Ikhmet
know the nooks of the temple and may move through a secret passage with
no movement penalty. The Scorpion Broodmother cannot move through secret passages
Poisoned:
When attacked by a Giant Scorpion, instead of suffering damage as usual, a
hero must place a number of poison tokens  equal to the amount of damage either on the Melee Attack or the Move space of
their hero’s sheet. Each poison token on an action space reduces by 1
the exertion limit of that action. When both exertion limits are reduced
to zero, that hero immediately dies. If additional poison tokens
are needed,
you can use any other token to represent them.
equal to the amount of damage either on the Melee Attack or the Move space of
their hero’s sheet. Each poison token on an action space reduces by 1
the exertion limit of that action. When both exertion limits are reduced
to zero, that hero immediately dies. If additional poison tokens
are needed,
you can use any other token to represent them.
Immune:
A hero with this ability had developed a resistance to poison. At the
beginning of the Action phase, whether the hero is aggressive or cautious,
that hero may remove one poison token
from one
of the action spaces of their hero’s sheet. Ikhmet
is Immune for this scenario.
Darkness: The maze of tunnels is plunged into an impenetrable darkness. There is no line of sight between two different areas of the whole board. Each action that requires line of sight can only be performed within a single area.
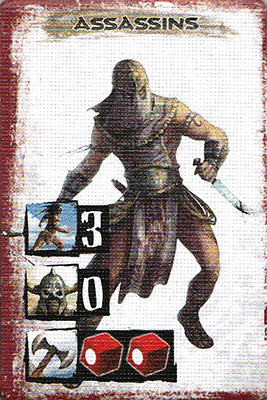
Assassins:
The Assassins are stealthy. During setup, the Overlord shuffles 6 assassin tokens
 ,
3 with a face showing a X, and 3 with a face
showing a ✔, and randomly places
them facedown on the board as indicated by the setup diagram, then looks
at them secretly. The Overlord may look at the assassins tokens secretly
anytime during the game. When the Assassin’s tile is activated, the
Overlord may move all the Assassin models and all the assassin tokens as
if they were Assassin models. When an Assassin’s token is moved into a
hero’s area, or when a hero moves into an assassin token’s area, that
token is revealed. If the token shows a X,
it was a decoy and that token is discarded. If the token shows a
✔, the token is replaced by an
Assassin model. When all the Assassin models have been placed on the
board, discard the remaining assassin tokens. Assassin tokens do not
block secret passages.
,
3 with a face showing a X, and 3 with a face
showing a ✔, and randomly places
them facedown on the board as indicated by the setup diagram, then looks
at them secretly. The Overlord may look at the assassins tokens secretly
anytime during the game. When the Assassin’s tile is activated, the
Overlord may move all the Assassin models and all the assassin tokens as
if they were Assassin models. When an Assassin’s token is moved into a
hero’s area, or when a hero moves into an assassin token’s area, that
token is revealed. If the token shows a X,
it was a decoy and that token is discarded. If the token shows a
✔, the token is replaced by an
Assassin model. When all the Assassin models have been placed on the
board, discard the remaining assassin tokens. Assassin tokens do not
block secret passages.
Water of Styx: The water area is not accessible for this scenario.
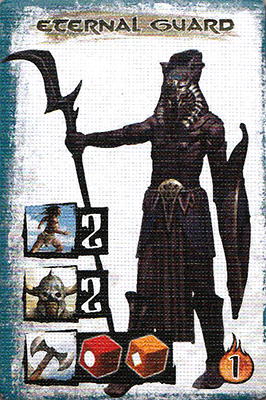
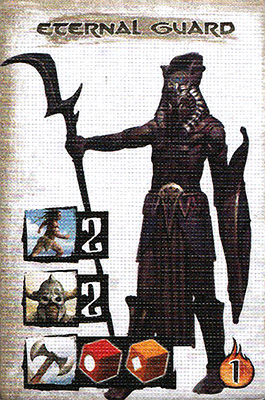
Body Search: Each time a hero kills an Eternal Guard, that hero may perform a complex Manipulation with a difficulty of 1 to search that guard. If successful, that hero draws a card from the asset deck. Then that Eternal Guard model is removed from the board whether that hero chooses to search it or not.
Reinforcements: Reinforcements are placed in an area with a secret passage token in level 0 or 1. The reinforcement cost of a model is doubled when a model is reinforced in level 0.
The Scorpion Broodmother:
When the Scorpion Broodmother tile is activated, the Overlord starts the
activation by rolling 1 Yellow, 1 Orange, and 1 Red


 die.
For each symbol shown on the dice, the Overlord may place a
Giant Scorpion model in the Scorpion Broodmother’s area or in an area
adjacent to that area. If that area is already occupied (and the model’s
base cannot fir entirely in the area), the Overlord may place that model
in an area adjacent to the occupied area.
die.
For each symbol shown on the dice, the Overlord may place a
Giant Scorpion model in the Scorpion Broodmother’s area or in an area
adjacent to that area. If that area is already occupied (and the model’s
base cannot fir entirely in the area), the Overlord may place that model
in an area adjacent to the occupied area.
Torch: At the beginning of their action phase, a hero in aggressive stance with a Torch may discard it to kill all the Giant Scorpion models in that hero’s area.
Antidote:
A hero with an Antidote may discard it to remove all the poison tokens
from one
of the action spaces of their hero’s sheet.