Facing the Serpent-Specter
A relentless hail of arrows flies from the forest to crash upon the palisade of Fort Tuscelan. Hordes of naked silhouettes, covered in ritual paints, surround the fort. The Black River swarms with their canoes.
Howling like wolves, hundreds of ferocious Picts surge from the edge of the wood and begin an assault on the gates and the ramparts, defended under torchlight by Aquilonian soldiers.
A group of warriors observes the scene from a distance. “Are we going to cut our way into the fort?” asks one of Conan’s companions. The Cimmerian shakes his head and announces, with a serious tone: “The fort is done for, but we can still warn and save the settlers located between the fort and the Thunder River. The Picts, drunk with blood, will swarm Eastward.”
As the warriors run along the road leading to Velitrium, they reach the Scalp, a small river beyond which the first settlements can be found. But to their great surprise, the Picts have outpaced them, probably a small detachment unwilling to wait until the fort is taken and wanting to surprise the settlers in their beds to more easily massacre them.
Conan and his companions at arms rush to save the villagers at the same moment Zogar Sag, leading the warriors, let out a hideous cry. A few moments later, a legendary monster appears – a creature known to have disappeared long ago: the terrifying Serpent-Specter.
Winning the Game
Heroes
If the total number of devoured villagers and villagers on the board is less than 5, most of the village’s inhabitants manage to escape to safety; the heroes win the game. They also win by killing the Serpent.Overlord
If 5 villagers have been devoured, all hope is lost; the Overlord wins the game.Setup
Heroes
3 |
Suggested Heroes and Equipment: |
|
 |
Conan (Battle Axe, Shield, Leather Armor) | |
 |
Shevatas (Kris, Throwing Knives) | |
 |
Hadrathus (Dagger, Teleportation, Mitra’s Halo, Lightning Storm). Hadrathus does not start with Mitra’s Halo cast. |
 |
After setup, each hero moves 5 gems from their Reserve zone to their Fatigue zone. |
Overlord
 |
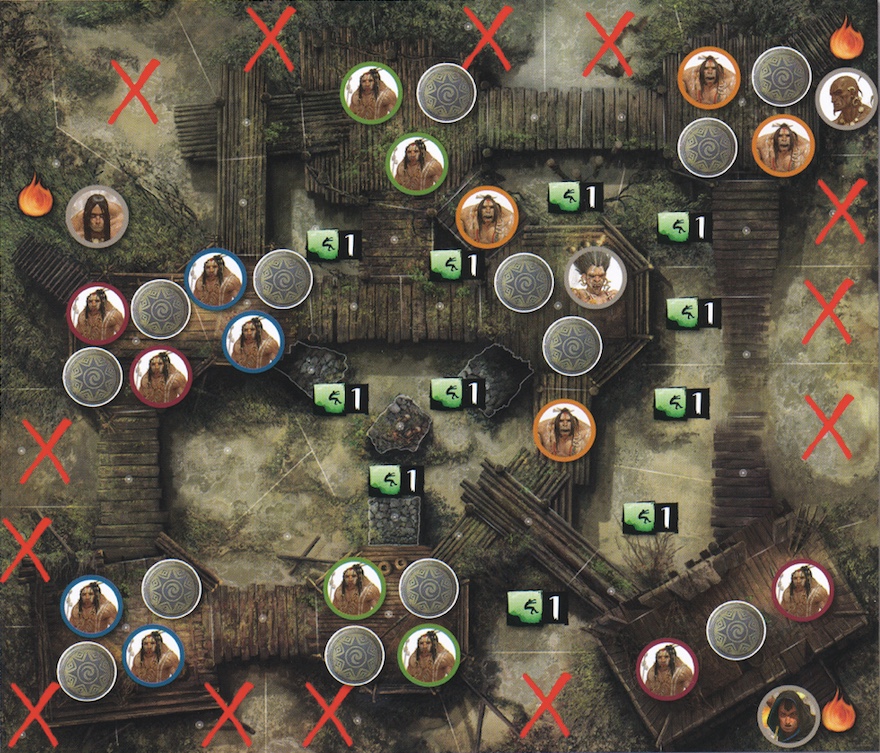
The game starts with the Overload’s turn. The heroes start in the areas indicated by the setup diagram. |
 |
The Overlord starts with 3 gems in their Reserve zone and 8 in their Fatigue zone, and places the recovery token showing a recovery value of “5” in the Book of Skelos. |
 |
When an event tile is activated the Overlord resolves any one of the following events: Reinforcement: 6 reinforcement points
Suffocating Gas: The Overlord chooses an area
and rolls 1 Red |
 .
. die. Each character in that area suffers damage equal to the
number of symbols shown on the die with no possible defense.
die. Each character in that area suffers damage equal to the
number of symbols shown on the die with no possible defense. |
During setup, the Overlord places 13 tokens on the board representing the villagers as indicated by the setup diagram. |
 |
 |
 |
 |
 |
 |
 |
|
 6 |
 14 |
Special Rules
The Serpent-Specter:
The Serpent cannot spend movement points to move. Once per turn, during
the Serpent’s activation, the Overlord may place the Serpent model in a
water area with no enemy characters. The Serpent model is removed from
the board at the start of the next Overload turn. During the Serpent’s
activation, the Overlord can spend 2 gems to place an opening token
 on a wall
adjacent to the Serpent’s area. The first time the Serpent has 7 or fewer
life points, flip the rightmost Serpent tile in the River facedown. The
Serpent can attack and be attacked by an enemy character in an adjacent
area with a Melee Attack.
on a wall
adjacent to the Serpent’s area. The first time the Serpent has 7 or fewer
life points, flip the rightmost Serpent tile in the River facedown. The
Serpent can attack and be attacked by an enemy character in an adjacent
area with a Melee Attack.
Villagers: A villager on the board can be attacked as though it were an enemy character. Each villager has 1 life point and no armor, and counts as an object with an encumbrance value of 6. When the Serpent attacks a villager, that villager is devoured. The Serpent cannot attack a villager if there is a hero in that villager’s area. If a villager is killed by a hero, that villager is devoured. If a villager is in a reinforcement area with a hero, remove that villager from the board.
Water: A character must spend 1 extra movement point to move out of a water area. A character can move from a water area to an adjacent wood area by spending 2 extra movement points.
Leap: Leaping over the water area around the altar in a single movement is not possible. The character must stop in the altar area before performing a second leap.
Deep Water: Areas marked with a red “X” in the setup diagram are not used in this scenario.